|
|
THE VOLCANO
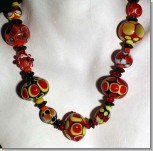
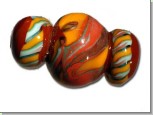
 I designed the Volcano in May of 1997 to overcome certain disadvantages of conventional bead making procedures. This oven reduces the discoloring effect that propane gas causes on most glass. Heat is radiated from the Volcanos walls, causing the glass to heat from all sides, not just within the flame. The result is a quicker melt and a recycling of heat. It is very economical to run because the energy is used and converted to infrared heat. Although you are working inside the oven, your working area is larger than with an open flame system. The heat radiated inside the Volcano is higher and maintains 1000C within a radius of 2cm from the flame. I have also found the Volcano very useful in making stringers for both fusing and bead making.
VOLCANO USA
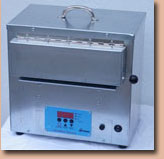
The Volcano USA is a fast melting kiln. The new burner can be adjusted with the regulator on the burner itself. Short flame with a hotter temperature than before and cleaner burning due to the Swirl Flame.
The burner head is set up as shown with the head about 2 cm from the port. The flame is short so there is not much to see. It helps if you have experience with the earlier Volcano.
The" hot spot" where to melt the glass is big and in this area you must test with the glass rod where the working area is. Any changes in gas pressure will cause changes in the working areas.
I work off a 5 kg Propane tank with a regulator set for 1,5 bar. The tube is fitted to the burner regulator valve. This is where all the adjustments are done. I do not have it fully open but near to full. Too low a setting will cause reduction fire.

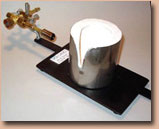
VOLCANO BEAD MAKING OVEN
This oven is designed to make a clean burning flame which will allow most colours to keep their true colours. Maximum temp.1200°C. Propane gas is the fuel and no other bottled gas is needed. The way to set up the correct conditions for this is in this page under "Set up and opperation". The burner is at a distance from the port that the Blue flame is totally out side the oven.
The temperature can be lowered by moving the burner back by pushing the sliding arm in. The oven has its different working zones (see below "Volcano working zones").
Once the oven is lit and the flame is entering the oven you will notice that it spins around ,warming up the walls before it rises up and out of the oven. The oven heats up fast ,do not touch the oven or the burner head. The base plate however is in turn heated and is hot, but this surface is useful for pre-heating the millefiori or other small glass parts you want to use. The glass rod is placed on the stand with one end on the volcano wall to preheat the rod.
The preheated glass pieces can be picked up from the base plate by rolling the hot molten glass bead over the glass pieces and placed in the top of the oven "parking zone" to heat up and after a few seconds slowly lower the bead towards the flame, at the back of the oven . Here the pieces can melt into the bead and the colours remain clean.
The upper part of the oven is used as a working place to add new glass or dichro and as this area is very hot you get extended working time as the hot air around the bead has a slow cooling effect on the molten glass.( No tools in the oven, only the glass) Tools are used only out side the oven for shaping the glass.
SETUP AND OPERATION
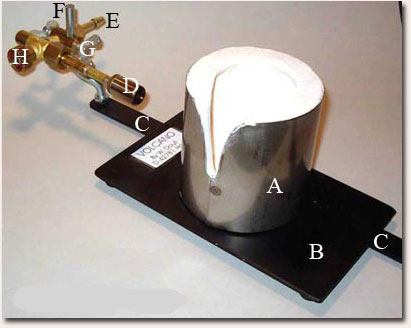
A. Oven body
B. Volcano base
C. Sliding arm
D. Burner
E. Hose connection
F. Offset arm
G. Butterfly nuts
H. Burner control
SET-UP
The propane gas tube is connected to E and the gas pressure is set to 1,5 Bar. Make sure there is no gas leak, from any of the connections . Test this with soapy water and where you see bubbles , tighten. Gas connections are left hand thread ! When no bubbles from any connection are seen the next step.
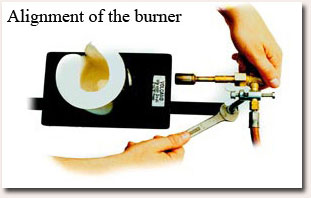
Aligning the burner Mount the burner D on the offset rod F with the burner height even with the portal of the oven body A. Use the butterfly nuts G to tighten just enough to hold in place. The oven body A is a little off centre at 11 o clock direction, locking nut under the base B.
Loosen the nut on the offset rod . Position the burner that it is in line with the portal . Tighten the other butterfly nut to hold the burner and now tighten the nut on the off set rod.
The burner should be in line with the portal when the sliding arm is in and when extended. l !After visual alignment, light the torch at the maximum distance from the Volcano. Now slide it to within 5cm distance (remember never to let the burner enter the oven porta). The flame should now spin counter clockwise.
Attention! The oven body heats up very quickly and the base plate becomes quite hot. These are good areas on which to rest glass pieces for pre-heating. The strength of the flame can be adjusted using the torch valve or by adjusting the gas pressure
Caution! Always use in a well-ventilated area. Check that none of the gas connections are leaking. Test with soapy water where there are bubbles, there are leaks. Never use a flame to test for gas leaks!
Be careful not to touch the oven body or the base. They become very hot.The torch head (burner) should never enter the oven orifice.
Never leave a lit torch unattended!
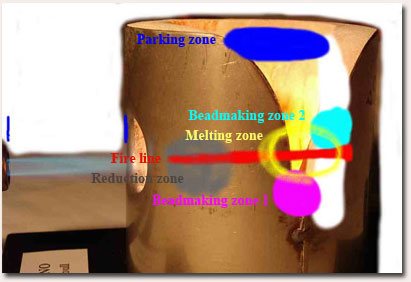
VOLCANO WORKING ZONES
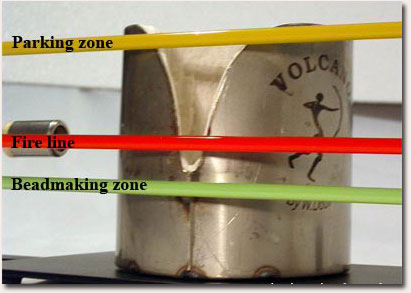
These heat zones are pointed out to help you so that you can make clean coloured glass beads . Most important is to work the glass in the back end of the oven. Try not to get the glass in the Reduction zone.

|